


Single player Gameplay Ability System (GAS) in UE5
Posted on November 2025
In this tutorial, we're going to create a simple Unreal Engine Gameplay Ability System (GAS) in single player. This is perfect for creating a core gameplay system for your abilities without the complexity of replication.
If you want the completed projects, they are available on my Patreon in two forms:
STEP 1 - ENABLE THE PLUGINS
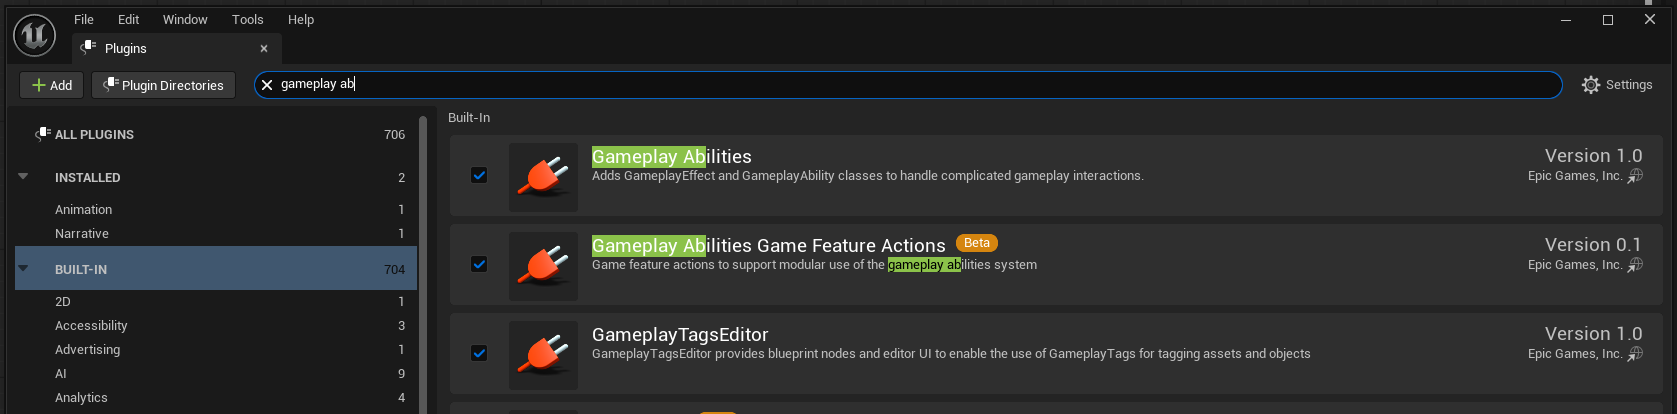
Firstly, open your Unreal project. Go to Edit -> Plugins and enable Gameplay Abilities and Gameplay Tags Editor — then restart Unreal.
STEP 2 - CREATE THE BASE CHARACTER C++ FILE
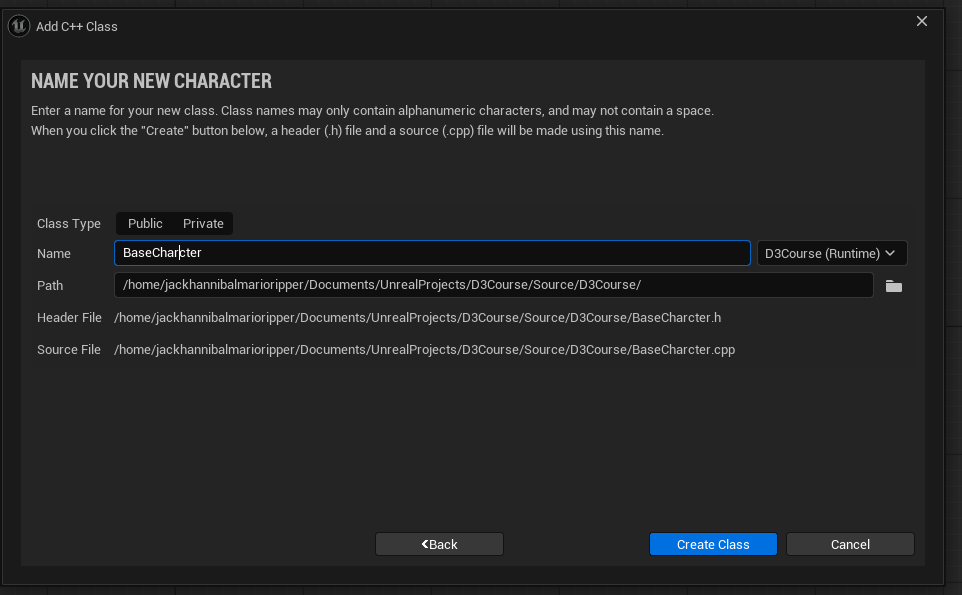
Unreal requires a C++ base character so you can apply the AbilitySystemComponent to it. Go to Tools -> New C++ Class. Select Character and name it BaseCharacter. Click Create Class.
Now inside the BaseCharacter.h file, paste the following:
Note: If you named it something custom, replace the class name in the code below. You can also use the box below to automatically update GASSAMPLEPROJECT_API with your own project name:
GASSAMPLEPROJECT_API→GASSAMPLEPROJECT_APIType your Unreal Engine project name or module API macro. All code blocks below will update in real time for effortless copying!
#pragma once

#include "CoreMinimal.h"
#include "GameFramework/Character.h"
#include "AbilitySystemInterface.h"
#include "Abilities/GameplayAbility.h"
#include "BaseCharacter.generated.h"

UCLASS()
class GASSAMPLEPROJECT_API ABaseCharacter : public ACharacter, public IAbilitySystemInterface
{
    GENERATED_BODY()

protected:
    virtual void BeginPlay() override;

    UPROPERTY(EditAnywhere, BlueprintReadOnly, meta=(AllowPrivateAccess=true))
    class UAbilitySystemComponent* AbilitySystemComponent;

    UPROPERTY(EditAnywhere, BlueprintReadOnly, meta=(AllowPrivateAccess=true))
    const class UBaseAttributeSet* DefaultAttributeSet;

    UPROPERTY(EditAnywhere, BlueprintReadOnly, meta=(AllowPrivateAccess=true))
    TArray<TSubclassOf<class UGameplayAbility>> DefaultAbilities;

public:

    ABaseCharacter();
    virtual UAbilitySystemComponent* GetAbilitySystemComponent() const override;

    UFUNCTION(BlueprintCallable, Category = "Ability")
    bool IsDead() const;

    virtual void SetupPlayerInputComponent(class UInputComponent* PlayerInputComponent) override;
};
Now inside BaseCharacter.cpp paste the following:
#include "BaseCharacter.h"
#include "BaseAttributeSet.h"
#include "AbilitySystemComponent.h"

ABaseCharacter::ABaseCharacter()
{
    PrimaryActorTick.bCanEverTick = true;

    AbilitySystemComponent = CreateDefaultSubobject<UAbilitySystemComponent>(TEXT("AbilitySystemComponent"));
}

UAbilitySystemComponent* ABaseCharacter::GetAbilitySystemComponent() const
{
    return AbilitySystemComponent;
}

bool ABaseCharacter::IsDead() const
{
    if (!AbilitySystemComponent)
        return false;

    return AbilitySystemComponent->GetSet<UBaseAttributeSet>()->GetHealth() <= 0;
}

void ABaseCharacter::BeginPlay()
{
    Super::BeginPlay();

    if (AbilitySystemComponent)
    {
        AbilitySystemComponent->InitAbilityActorInfo(this, this);
        DefaultAttributeSet = AbilitySystemComponent->GetSet<UBaseAttributeSet>();

        for (TSubclassOf<UGameplayAbility> Ability : DefaultAbilities)
        {
            AbilitySystemComponent->GiveAbility(FGameplayAbilitySpec(Ability, 1, INDEX_NONE, this));
        }
    }
}

void ABaseCharacter::SetupPlayerInputComponent(UInputComponent* PlayerInputComponent)
{
    Super::SetupPlayerInputComponent(PlayerInputComponent);
}
STEP 3 - GIVE C++ ACCESS TO THE GAMEPLAY ABILITY SYSTEM
Just like you give Blueprints access to the GAS system via Edit -> Plugins, you need to do the same for C++ using the Build.cs file.
Open GASSampleProject.Build.cs
using UnrealBuildTool;

public class GASSampleProject : ModuleRules
{
    public GASSampleProject(ReadOnlyTargetRules Target) : base(Target)
    {
        PCHUsage = PCHUsageMode.UseExplicitOrSharedPCHs;

        PublicDependencyModuleNames.AddRange(new string[] { "Core", "CoreUObject", "Engine", "InputCore", "GameplayAbilities", "EnhancedInput", "GameplayTags" });

        PrivateDependencyModuleNames.AddRange(new string[] { });
    }
}
STEP 4 - CREATE THE BASE ATTRIBUTE SET C++ FILE
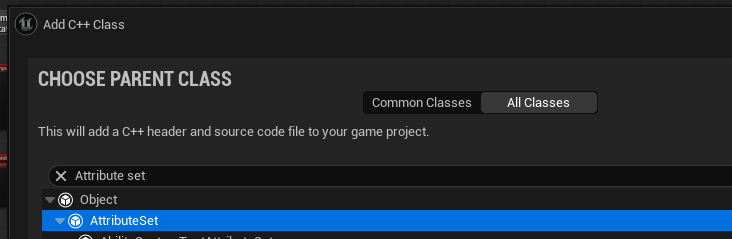
Attribute Sets are the core of GAS, giving your players variables such as Health, Stamina, Mana, etc. Go to Tools -> New C++ Class. Select Attribute Set and name it BaseAttributeSet. Click Create Class.
Now inside BaseAttributeSet.h, paste the following:
#pragma once

#include "CoreMinimal.h"
#include "AttributeSet.h"
#include "AbilitySystemComponent.h"
#include "BaseAttributeSet.generated.h"

#define PLAY_ATTRIBUTE_ACCESSORS(ClassName, PropertyName) \
GAMEPLAYATTRIBUTE_PROPERTY_GETTER(ClassName, PropertyName) \
GAMEPLAYATTRIBUTE_VALUE_GETTER(PropertyName) \
GAMEPLAYATTRIBUTE_VALUE_SETTER(PropertyName) \
GAMEPLAYATTRIBUTE_VALUE_INITTER(PropertyName)

DECLARE_DYNAMIC_MULTICAST_DELEGATE_TwoParams(FPlayAttributeEvent, float, EffectMagnitude, float, NewValue);

UCLASS()
class GASSAMPLEPROJECT_API UBaseAttributeSet : public UAttributeSet
{
    GENERATED_BODY()

public:
    virtual void PostGameplayEffectExecute(const struct FGameplayEffectModCallbackData& Data) override;

   	//Health
    UPROPERTY(BlueprintReadOnly)
    FGameplayAttributeData Health;
    PLAY_ATTRIBUTE_ACCESSORS(UBaseAttributeSet, Health);

    UPROPERTY(BlueprintAssignable, EditAnywhere)
    FPlayAttributeEvent OnHealthChanged;

	//Max Health
    UPROPERTY(BlueprintReadOnly)
    FGameplayAttributeData MaxHealth;
    PLAY_ATTRIBUTE_ACCESSORS(UBaseAttributeSet, MaxHealth);

    UPROPERTY(BlueprintAssignable, EditAnywhere)
    FPlayAttributeEvent OnMaxHealthChanged;
};
For any additional attributes you want to add simply add the 5 lines per attributes for the:
- Property metadata
- Gameplay Attribute Data variable
- Play Attribute Macro
- Delegate / Event Dispatcher metadata
- Delegate / Event Dispatcher definition
UPROPERTY(BlueprintReadOnly)
FGameplayAttributeData Mana;
PLAY_ATTRIBUTE_ACCESSORS(UBaseAttributeSet, Mana);

UPROPERTY(BlueprintAssignable, EditAnywhere)
FPlayAttributeEvent OnManaChanged;
Now inside BaseAttributeSet.cpp paste the following:
#include "BaseAttributeSet.h"
#include "GameplayEffectExtension.h"

void UBaseAttributeSet::PostGameplayEffectExecute(const struct FGameplayEffectModCallbackData& Data)
{
    if (Data.EvaluatedData.Attribute == GetHealthAttribute())
    {
        SetHealth(FMath::Clamp(GetHealth(), 0, GetMaxHealth()));
        OnHealthChanged.Broadcast(Data.EvaluatedData.Magnitude, GetHealth());
    }

    if (Data.EvaluatedData.Attribute == GetMaxHealthAttribute())
    {
        OnMaxHealthChanged.Broadcast(Data.EvaluatedData.Magnitude, GetMaxHealth());
    }
}
Then again, for any additional attributes you have added simply add the 3 (minus brackets) lines per attributes for the:
- If check for the attribute
- Clamping (if required)
- Delegate / Event Dispatcher - broadcast / call
if (Data.EvaluatedData.Attribute == GetManaAttribute())
{
    SetMana(FMath::Clamp(GetMana(), 0, GetMaxMana()));
    OnManaChanged.Broadcast(Data.EvaluatedData.Magnitude, GetMana());
}
STEP 5 - CREATE AN ATTRIBUTE SET IN UNREAL
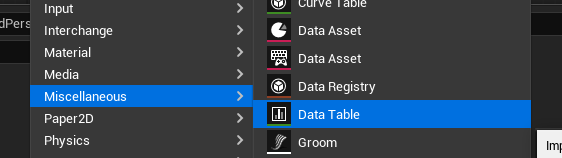
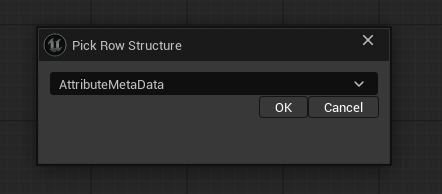
The C++ is now all done. Compile the code and open Unreal. Right Click -> Miscellaneous -> Data Table -> AttributeMetaData. Name it something like Attributes_Player.
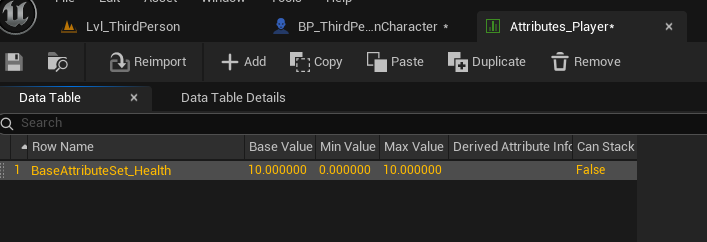
Now inside Attributes_Player, for each of your defined attributes, add the ClassName_Attribute (e.g., BaseAttributeSet_Health for Health). Set the value, Min, and Max. The Min and Max fields are not used but it's better to have them preset.
STEP 6 - REPARENT ALL CHARACTERS
Now you can start reparenting your player character and NPCs. The C++ we added for BaseCharacter is just a wrapper around Unreal’s Character class. If you have a plugin or your own custom C++ character class, you will need to merge them.
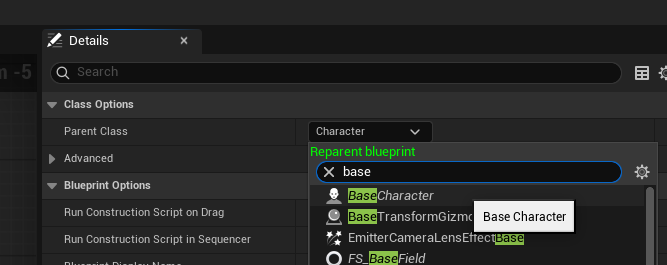
Simply open the Blueprint -> Class Settings -> Parent Class -> BaseCharacter, compile, and save.
STEP 7 - SET DEFAULT ATTRIBUTES
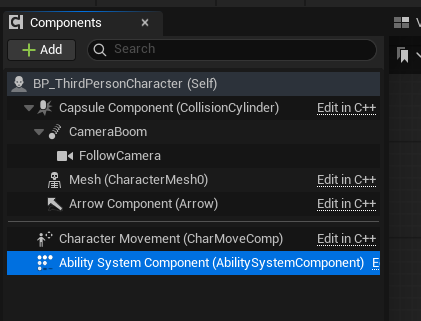
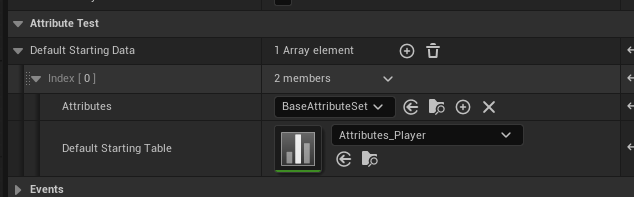
After reparenting, the character will have an AbilitySystemComponent in their components list. Select it and set the Default Starting Data to your newly created table.
STEP 8 - BASIC ABILITY
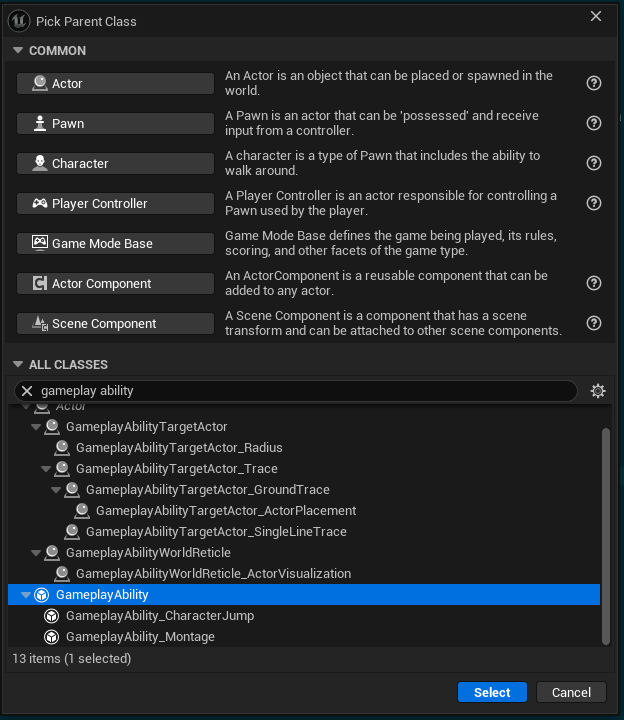
Now you have everything set up, you can start using GAS. Start by creating a basic ability. Go to your Content Drawer -> Right Click -> Blueprint Class -> Gameplay Ability. Name it GA_Jump.
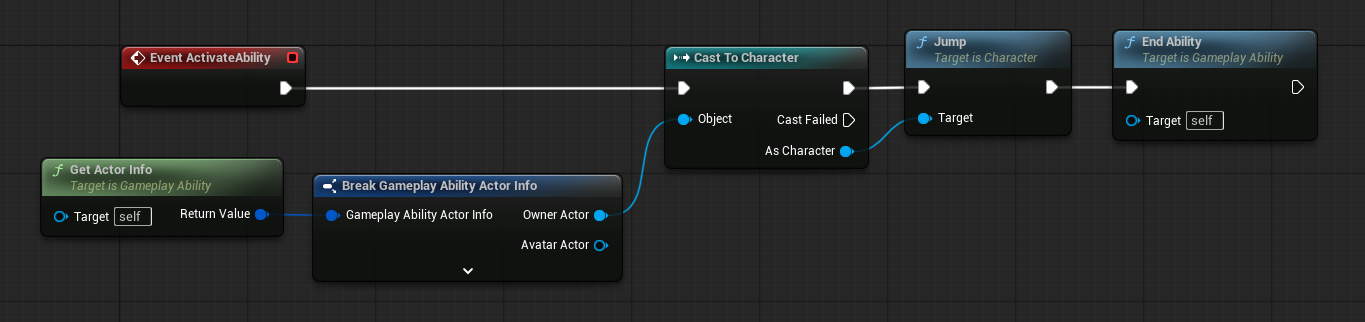
Open it and override the event Ability Activate.
Add the GetActorInfo node, break it, cast the Owner Actor to a Character.
Call the built-in Jump function and then call EndAbility.
Note: Always call EndAbility when you are done. Not doing so will soft lock the ability, preventing reactivation.
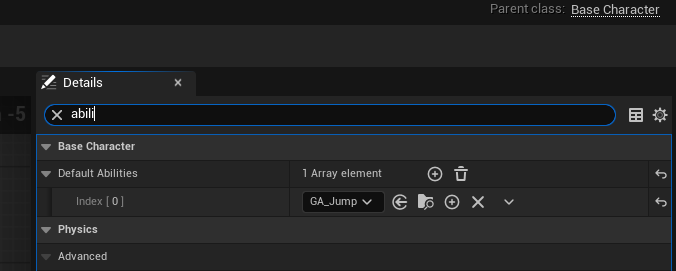
Finally, go back to your character, select Class Defaults -> Default Abilities and add the GA_Jump ability.
Now you just have to activate the ability when you want to jump. Find where the built-in code was calling Jump and delete that node. Add GetAbilitySystemComponent -> Try Activate Ability By Class.
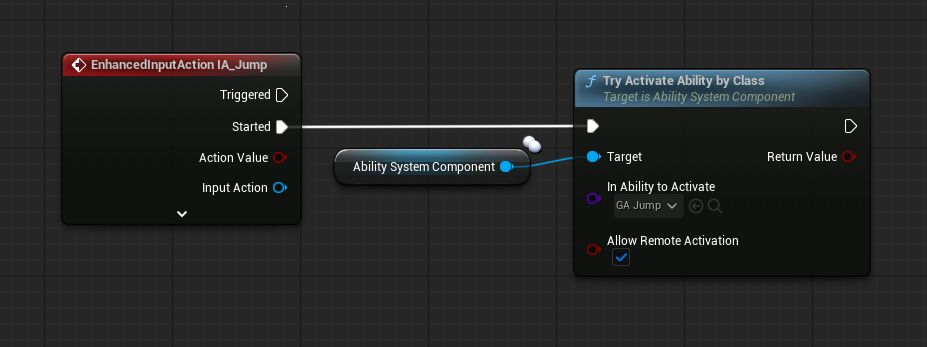
You now have a Gameplay Ability System set up for single player with attributes, default abilities, and a basic ability.